
* This post contains affiliate links. You can read my full disclosure policy here.
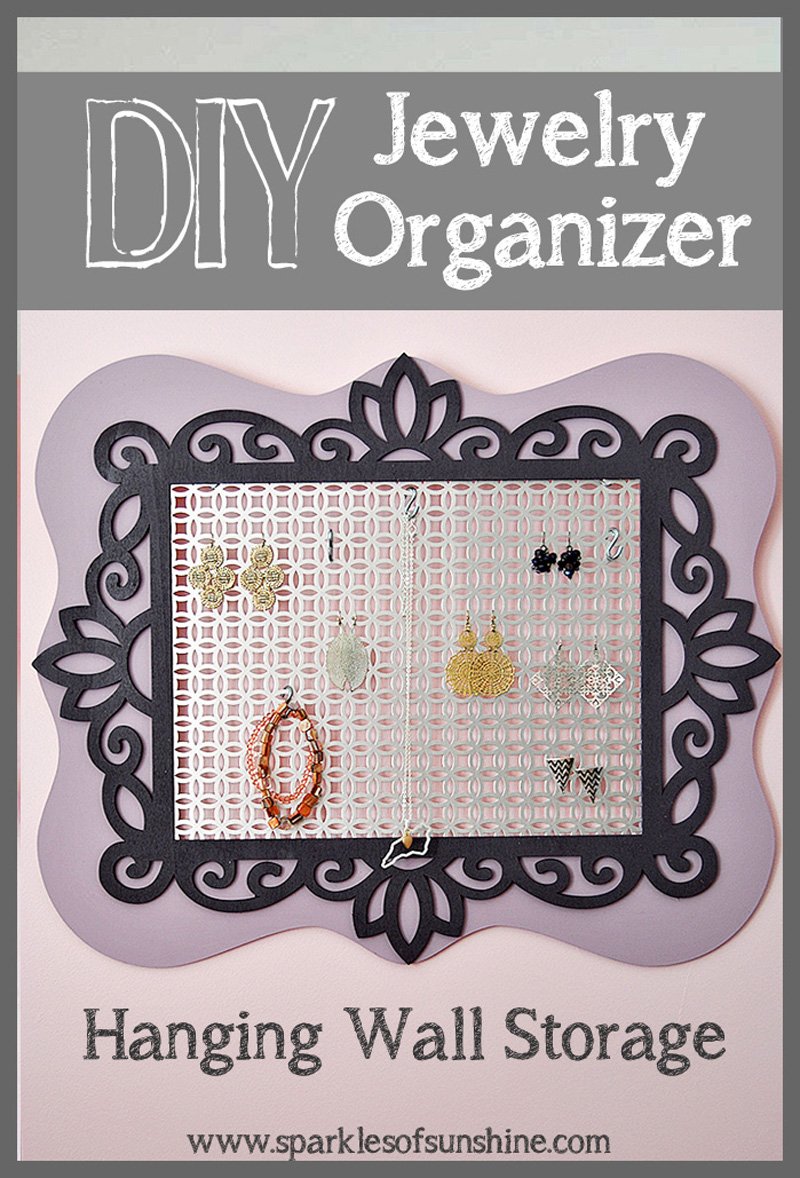
Looking for an easy way to get your jewelry organized? Today I have the answer for you with this easy DIY Jewelry Organizer. Whether you hang it in your closet, bedroom or bathroom, it’s the perfect hanging wall storage solution for displaying your jewelry in style!
 This project was a special project to me because I made it for my sweet niece, Norah, for her birthday this month. I decided I wanted to make her something for her birthday this year, so I purchased purple paint (her favorite color) and waited for inspiration to hit. When I stumbled across this awesome sheet metal while shopping out of town back in January, I knew exactly what I wanted to do with it! Every girl needs a cool way to store her jewelry, right?
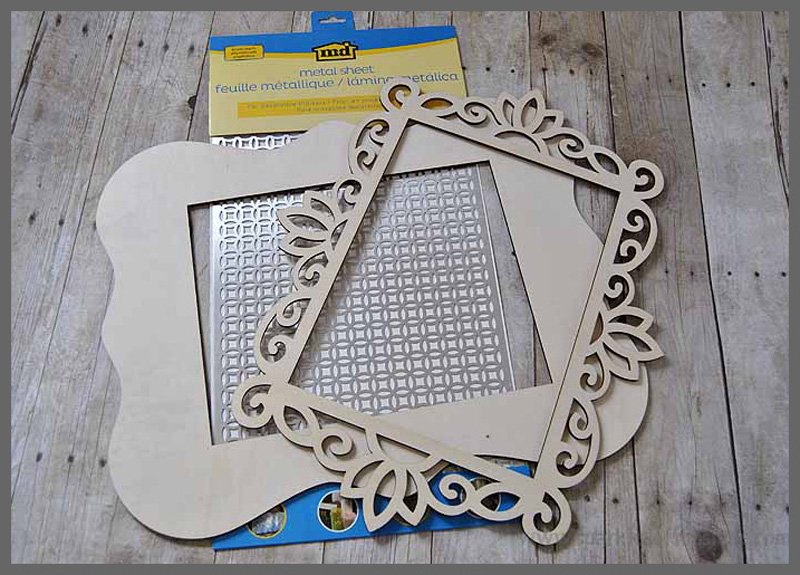
I had originally planned to simply take the glass out of a large picture frame, replace it with the sheet metal and call it a day, but I had trouble finding a frame I liked. I wanted her jewelry organizer to be pretty and girly, so when I spotted the laser cut wood frames at Michaels Craft Store I knew I had found what I was looking for. Layering two of these frames with the metal between them was now my plan, and it was time to put it into action!
 For this project you will need the following materials.
- Two laser cut wood frames
- Paint of your choice
- Construction glue (like Liquid Nails)
- Metal cutting shears
- Wire (for hanging)
- Small “S” hooks
- One sheet of decorative metal
If you’re like me and your local craft stores don’t carry it, you can purchase the sheet metal at Amazon. I can’t believe my local Joann Fabrics, Michaels and AC Moore stores do not carry it! It’s awesome, and I love that it comes in several different patterns.
I know I say this a lot, but this project really was super simple. You can make it in just 5 easy steps!
- Paint your wooden frames in the paint colors of your choice and let them dry.
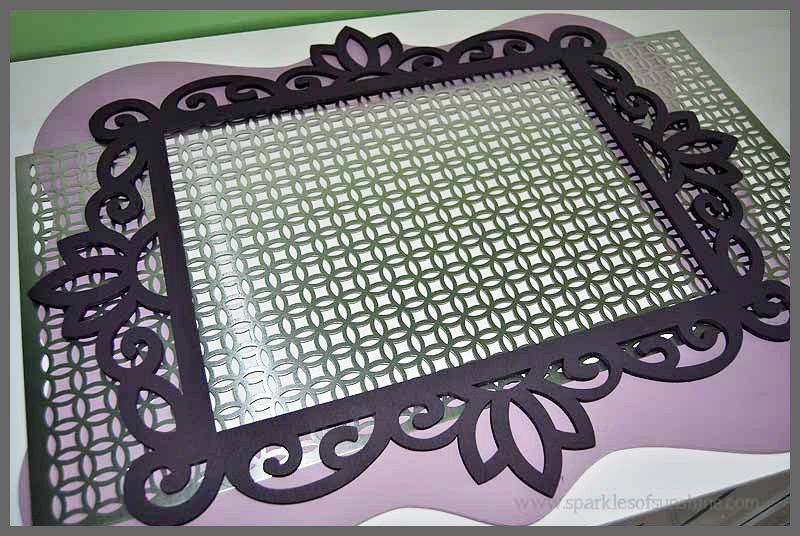
- Position the metal between the frames to determine the size you need to cut it for a perfect fit. You will want the metal to slightly overlap the opening on the background frame, but the top frame should cover and hide the edges of the metal. Once you’ve measured, use your shears to cut the metal to the correct size.

- Use the construction adhesive to glue the metal to the first frame. Use just a thin line around the edges, because if your glue is like mine, it doesn’t dry clear. You don’t want the glue seeping out and showing later!
- Adhere the frame and metal sheet to the background frame using the same construction adhesive.
- Once it dries, all you have to do is attach the wire hanger and you’re ready to put your new DIY Jewelry Organizer on display.
 I attached the picture hanging wire by threading it through the holes at the very top to secure it.
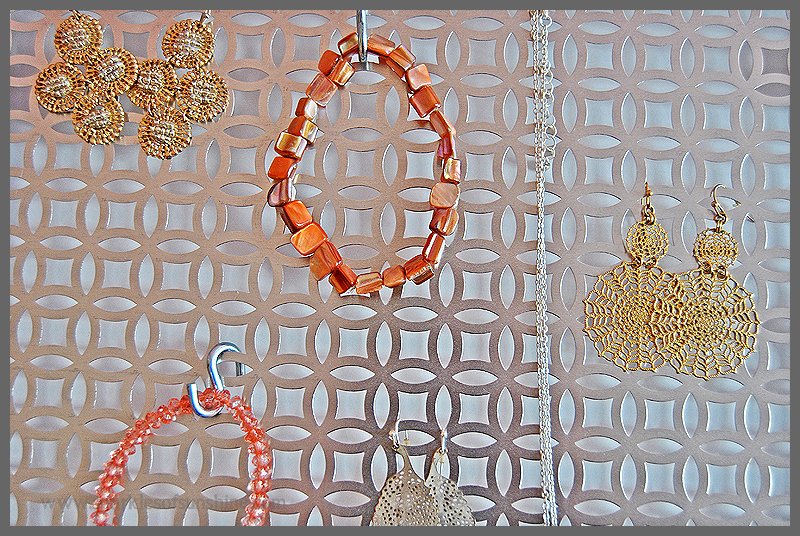 You can hang earrings on the jewelry organizer by placing the hooks into the holes on the metal sheet. It’s easy to hang necklaces and bracelets with the “S” hooks, too. I think I need one of these, too. I often forget what earrings I even own because they are buried underneath each other in an old fashioned jewelry box! I am putting this on my list of projects I need to do for myself. I have a lot of earrings, though, so I may need larger frames!
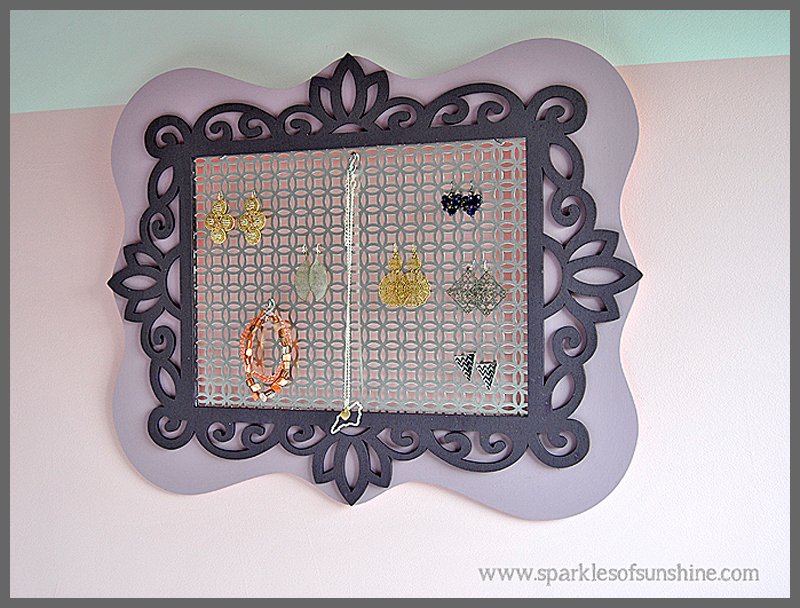 I love the way that these two shades of purple really make this DIY jewelry organizer stand out. This DIY Jewelry Organizer not only stores jewelry, but it also functions as a piece of art! I love that it looks so pretty on the wall, don’t you? It’s great that it doesn’t take up floor space, too!
Alright, the fun is over…it’s time for me to wrap this DIY Jewelry Organizer and deliver it to its new owner, Norah. I can’t wait to give it to her, because I think she’s going to love it! What do you think? Would you like one of these to organize your jewelry?
Shared with: Two Uses Tuesday


Wow, what a great gift idea for Mother’s Day! Thanks for sharing 🙂
That’s a great idea! It would make a great Mother’s Day gift!
This is so cute! I love it! What a neat idea
Thanks! I love it and want one, too!
This is great! I did something similar to this but with burlap and a picture frame. It was much more simple looking. I think I’ll try this one! Great post.
Thanks so much! I bet yours was cool, too, though. I love burlap! 🙂
This is amazing – I am inspired!!
what a great idea! This looks super decorative as well.. I may give this one a try.. thanks for sharing ;o)
I’m glad you like it! Thanks for checking it out! 🙂
This is super cute and looks like something even I could manage 🙂 I could really use this!
It is pretty simple to make! You could always cut the metal and stick it in an old picture frame to make it even easier. Thanks for checking it out!
So pretty! I love those wood boards from Micheal’s. The possibilites are endless but your project is especially clever.
This is so pretty! Pinned! Thanks for sharing.
That is gorgeous and so sweet! My five year old daughter got her ears pierced this year and would love this!
I’m sure she would love one! Thanks so much for stopping by today!
Wow you are so creative! I love this idea! Really cute blog too!
Glad to connect with you!
Best wishes
Valerie
xoxo
http://www.mapleleopard.com
Thanks, Valerie. I’m glad you like it! It’s great connecting with you, too! 🙂
This is so pretty Christie! I want this so badly in my house. Send it to me LOL
I wish I could, but it’s now in my sweet niece’s possession. She was happy to get it! 🙂
This is really beautiful and looks really simple. Your niece is lucky to have such a crafty aunt.
Thanks so much, Kristen! 🙂 It was a fun project since I was making it for her. I appreciate you stopping by to take a look at it today!
I really like jewelry organizer that are art pieces on their own. This is super classy, I like it a lot. I would totally make this if I ever decide to switch out my current jewelry organizer. 🙂
Thanks! Now my other niece wants one, too. I need one…I wore a pair of earrings today I’d forgotten I owned!