
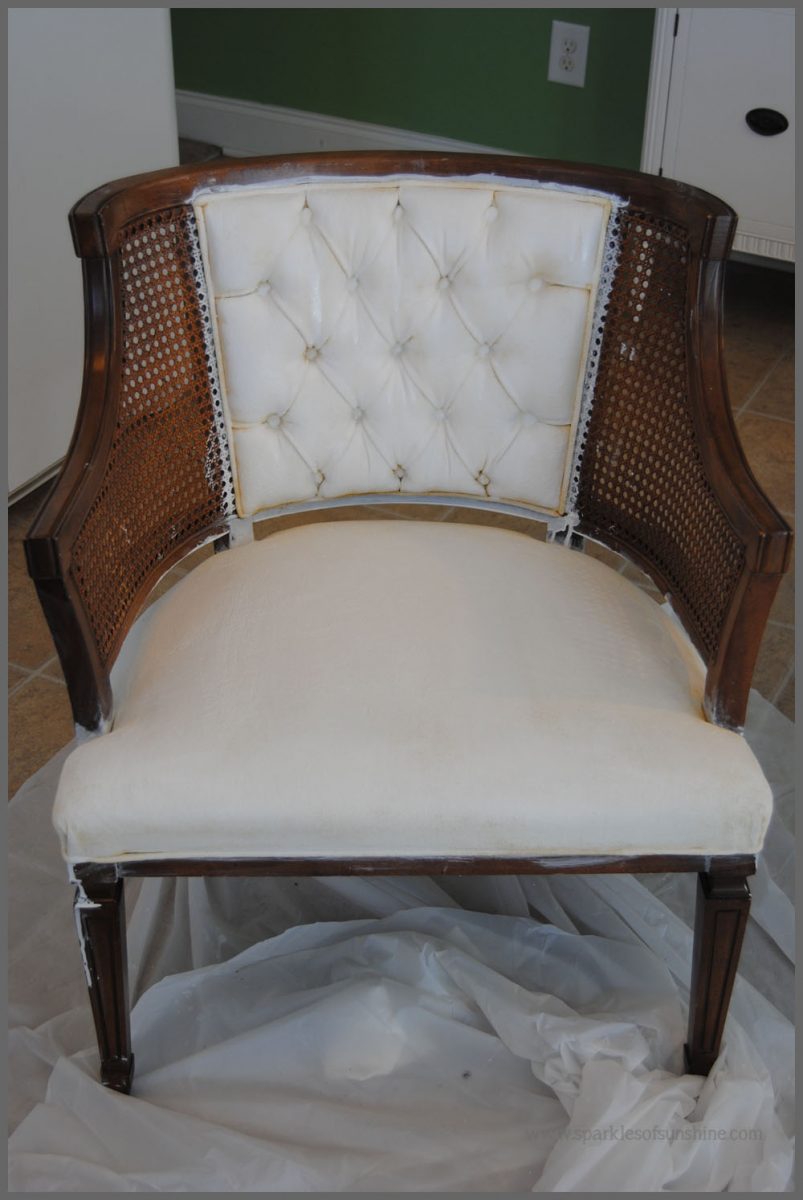
 If you’ve spent any time looking through the DIY pins on Pinterest, chances are you’ve run across tutorials detailing how to paint upholstery on furniture using paint and textile medium. I must admit the idea is very tempting, especially to someone like me with no reupholstering skills. So after spending much time reading several tutorials with claims on how easy it is to transform furniture pieces by painting the fabric, I decided it was time to give it a try. And when I stumbled across this beautiful chair at my local Salvation Army Thrift Store for only $5, I knew the time had come.
 So, is it really as easy as the tutorials make it sound? Can you really paint fabric on chairs and sofas and change its look with only some paint, textile medium and water? Well, today I’m going to give you my honest opinion based on my experience with this project.
After a trip to Michaels to stock up on Martha Stewart’s textile medium, I was ready to mix my paint. I followed the recipe I found online and mixed 1 cup of paint with 1 cup of textile medium and 1 cup of water. After misting the fabric with water, I painted my first coat, making sure to follow the grain of the velvet fabric.
Here is my chair after the 1st coat…
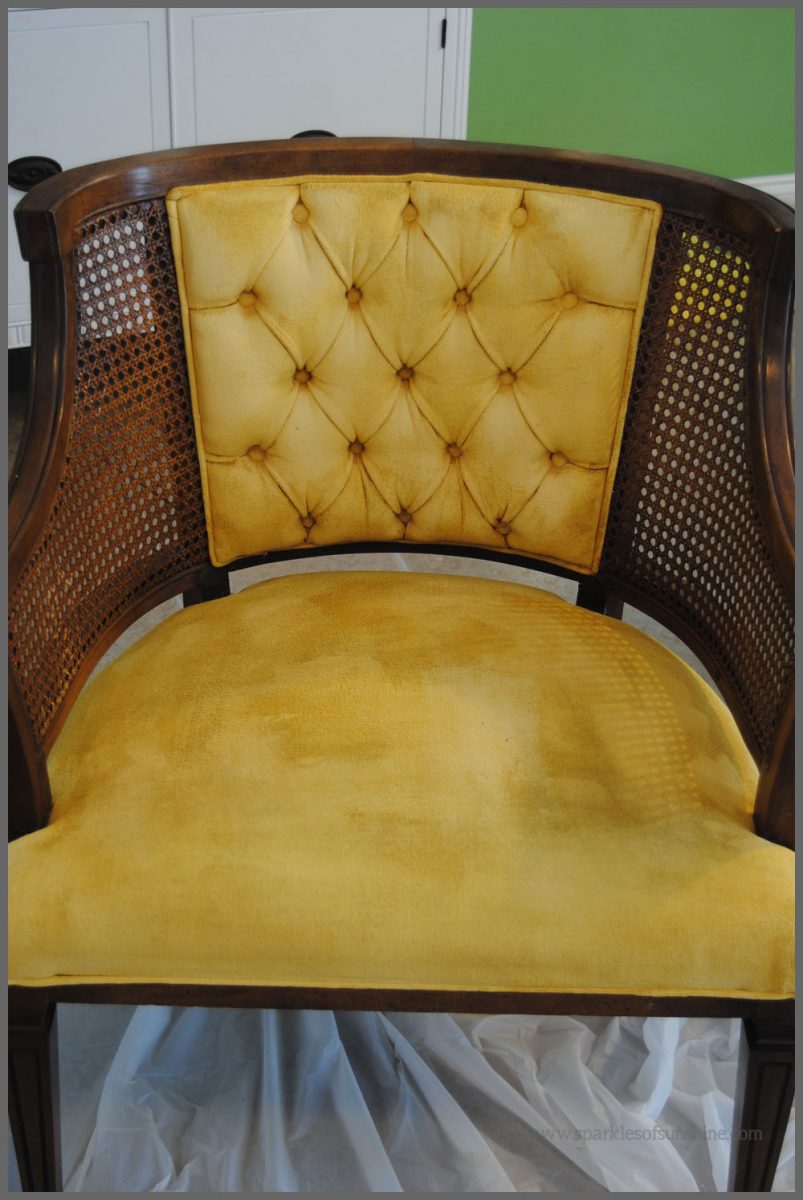 There was a slight change in color after the first coat. Once it was dry, I lightly sanded, misted it with water again, then proceeded with the next coat.
Here’s my chair after the 2nd coat…
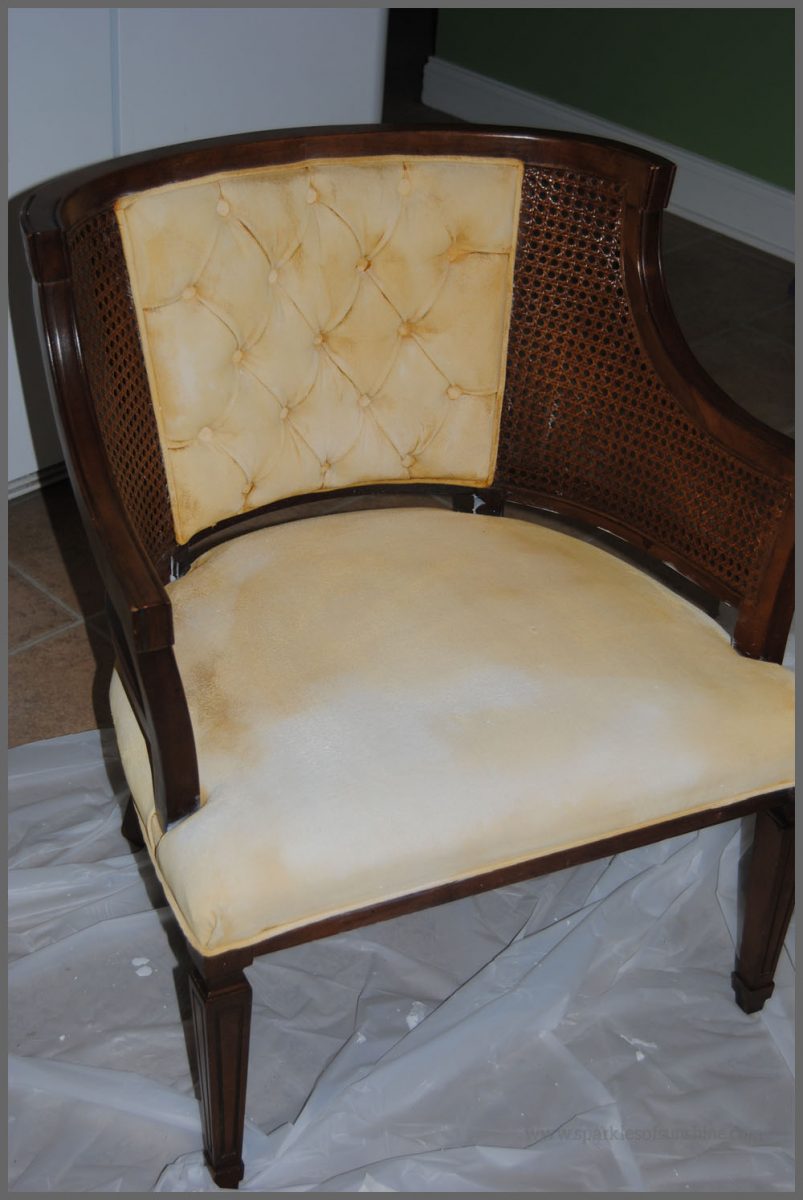 You can definitely see a change in color now, but it was really hard to get an even coat. It was especially hard to paint the hard to reach areas in the tufting. The fabric started to feel slightly rough to the touch, but I decided to keep going. After waiting for it to dry, lightly sanding and misting with water, it was time for the next coat.
Here’s my chair after the 3rd coat…
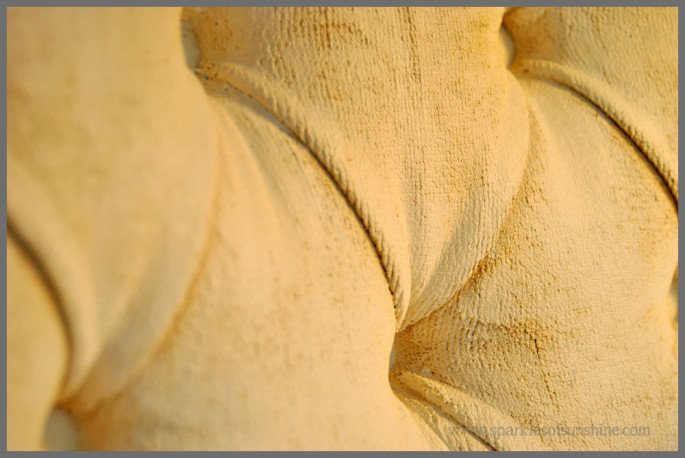
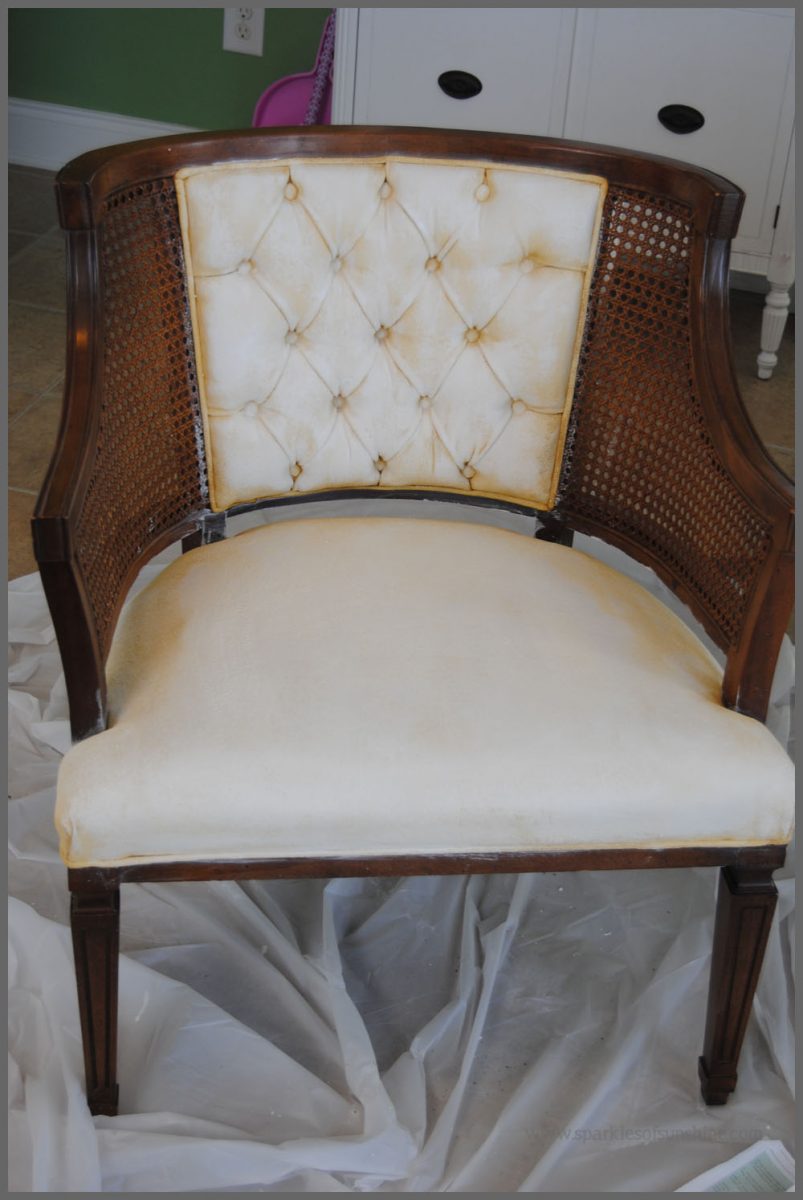 OK, now we’re cooking! I finally started to see some coverage, and I was so glad to see the ugly gold color go. But once the coat was dry, I was not happy with the hard texture of the fabric at all. Even after sanding the fabric, it was rough, hard and felt crunchy. Who wants to sit in a crunchy, uncomfortable chair? Since I hate to quit a project, I decided to give it another coat and pray something would change.
Here’s my chair after the 4th coat…
 I could finally see the light at the end of the tunnel! The chair was noticeably white with just a little yellow color peeking through in places…specifically in the tufted back portion. Once this coat was dry, I couldn’t take it anymore. I did some more research, and finally found a website that confirmed what I feared…painted fabric can feel scratchy and stiff to the touch. Who wants a scratchy chair? This is when I finally gave up and called it quits.
 Please don’t hate me. I really wanted this project to work out! I wanted this to be an easy way to update this chair and give it a new life in my home. If I had to do this all over again and really needed to paint this chair, I would purchase fabric paint from the craft store. Maybe there would have been a better result if I had used paint made for fabric for this project.
So, what did I learn from this project?
It’s OK to quit sometimes. When you’re working on a project and see that it’s not going right, just stop. Don’t be stubborn and keep on working. Sometimes it’s best to admit defeat, stop what you’re doing, and figure out what you need to do to correct the problem. Then start over again. Remember that the easiest way to learn something is by making a mistake. Trust me…I should know!
What works for someone else may not work for you. I’m still not really sure why this project didn’t work out for me. I could say it was the velvet fabric, but so many of the tutorials I’ve read used velvet fabric also. I used the same ratio many others recommended. I’m not sure how so many others had a different result than me when I followed the same procedure. I do understand that others may have had different results and are entitled to their opinions. I’m glad painting their fabric worked out for them…and I’m extremely jealous.
So, painted upholstery…is it meant to be, or not to be? In this case, it was definitely NOT meant to be. But don’t worry, because I never let anything go to waste. Stay tuned and come back next week to see what I did with this failed project. I promise you, I totally redeemed myself! In fact, I’m glad this painted upholstery project didn’t work out after all. I can’t wait to show you what I did with this chair next week!
Shared with: Home Matters Linky Party, Frugal Friday Link Up Party, A Morning Cup of Joe, Our Favorite Things Pinterest Party, Craft Frenzy Friday, Pin Me Linky Party, Frugal Crafty Home Blog Hop, Motivation Monday, Merry Monday, Share It Link Party, Treasure Box Tuesday, Lou Lou Girls Fabulous Party, Do Tell Tuesday, Teach Me Tuesday, Create Link Inspire, Creative Spark Link Party, Worthwhile Wednesdays, Pin Worthy Wednesday, Retro Re-Pin Party, Create & Share DIY and Recipe Party


I’ve actually never heard of painting fabric, but I can imagine that it’s rough to the touch! Hey, you only wasted a few bucks (can’t believe you found that chair for only $5!)….looks like it was a fun attempt!
Thanks, Betsy. Yes, the chair was definitely a steal, but even at $5 I wasn’t ready to let it go yet. Be sure to stop by Monday to see how I redeemed myself and saved this chair! Have a great weekend!
I have always wondered about painted fabric because I could never understand how it would NOT turn hard and scratchy. glad you failed before me lol. now I know I wont be trying it anytime soon! I mean think about when you paint burlap…even with fabric paint it makes it hard. hmmm…what are these other gals not telling us lol. shared 🙂
Thanks, girl. I was a little afraid to post this, just because of all the tutorials out there claiming it was awesome. Well, I tried it and it failed. Like you, I didn’t really think it would be possible, so I guess I just proved myself right. I’ll look at it like a scientific experiment!:)
I love this. In blog world everyone always has these perfect DIYs lol. When I started making mugs, I found tons a blogs that had it wrong or (in my opinion) advertised false results to get hits! Thanks of being honest… I’ll keep it in mind if I ever want to change upholstery!
Thanks, Brandy. I feel like I have a responsibility to my readers to share my true experiences, even if they don’t always work out. It is humbling to share my mistakes, but that’s how we learn and we all make them, right? I’m just happy to save someone else the heartache! Thanks so much for stopping by today!
Christie, I love that you shared your experience with this chair, even if it didn’t work out for you 🙁 Textile medium doesn’t work for me either, but I’ve found that if I use chalk paint and wax, it feels more like leather and less stiff. I’m excited to see what you’ve done with it 🙂
Thanks so much for the tip about chalk paint and wax, Stacy! If I decide to paint fabric again, I’ll give it a try. Make sure you stop by on Monday to see the finale on this chair. I am so in love with it now. 🙂
You are so brave, it actually looks terrific.♥ I invite you to share at my Thursday blog hop ( you can link up through Sat midnight) xo P.S. I am happy to be part of the giveaway with you. Please let me know if you would like to be added to my giveaway partner list 🙂
Thanks, Katherine. I’ll be sure to stop by! I would love it if you would add me to your giveaway partner list. Have a great weekend!
Never been a fan of the idea of painting fabric…..thanks for sharing this, you confirmed my fears! Can’t wait to see how you transform this!
I’m glad to save you from the same sort of catastrophe I experienced! I can’t wait for you to see how amazing this chair turned out after this mistake. 🙂
So glad you shared this post, haven’t tried Martha’s textile medium myself on upholstery, but had similar not so great results with her glass paint line compared to other brands. Actually haven’t tried chalk paint on fabric myself yet either, I find myself hesitant for this stiffness fear as well. I love that velvet texture to much!
Thanks for letting me know about Martha’s glass paint line. I will keep that in mind in the future! Yes, I do love velvet, too…just not 30 year old dingy gold velvet. Thanks so much for stopping by today!
Even the thought of painting fabric scares me! You are so brave! I think it looks fantastic.
Thanks! I’m so glad you think it looks great, but come back and see the final result on Monday, because it looks soooo much better now!
I have tried painting fabric with Delta Fabric Medium, Martha Stewart Fabric Medium and Annie SLoan Chalk Paint. There is a world of difference between the three. The Martha and latex experiment didn’t go well at all. The Delta Fabric Medium and latex paint was passable. The chalk paint and fabric is hands down my favorite!
You are the second person to mention that to me. It sounds like I may have to try chalk paint the next time!
Oh, please tell me you will be linking up next’s weeks chair redemption to the #HomeMattersParty ! Thanks for sharing your project-gone-wrong with us. It is always nice to be able to learn something from others’ mistakes. See you again next week. 🙂
~Lorelai
Life With Lorelai
Of course! I’d love to share it with you! Thanks for hosting such a fun party!
I’ve always wondered how painted upholstery would feel when touched. I have a chair I rescued from the curb that will be quite a reupholstery challenge and thought about painting it. But this chair will be used (as it should be) so I don’t want scratchy fabric. Maybe if the chair was just there for an extra something and not necessarily for functionality paint would be fine. Thank you for your honesty AND for sharing with us at Merry Monday!!
As much as I would love to keep up the appearance of being perfect, I just can’t! I keep finding myself sharing my mistakes with you guys! LOL I’ve heard that chalk paint can leave a smoother finish, but I think my days of painting upholstery are probably done. Thanks for stopping by and hosting such an awesome party!
I like this post. I can’t imagine painting velvet. I am sure it changes the texture. I have only painted pleather with homemade chalk paint. I love the color. That is a beautiful. Perhaps you can find away to get it reupholstered.
Yes, the velvet texture was definitely ruined by paint. Plus, it was really hard to paint the velvet so it looked uniform. I would definitely not recommend painting velvet based on my experience!
I came by to let you know that you’ve been featured at this week’s #HomeMattersParty – we’d love to have you come check it out!
Here’s the link: http://theroadtodomestication.com/2015/02/27/home-matters-linky-party-26/
Happy Friday!!!
Thanks, I’m headed over now!
Thanks for the info, I have been wondering about this~ as an artist I am very familiar with the characteristics of paint and how it would work on a chair. I will say that velvet was probably not a great fabric to paint, too much texture and thickness, which would cause the need for multiple coats…can’t wait to see how you salvaged it!
Jenna
Thanks, Jenna. Yes, I think velvet can be more difficult to cover properly. I read online where others applied up to 10 coats! I don’t have time for that, so I pulled that fabric off and gave it a complete overhaul. I hope you like my final result!
I love how you shared something that didn’t work and then posted your honest opinion! So great to see something less than perfect and real!
Thanks so much! It’s not easy to admit failure, but that is how we learn and improve our skills. Thanks so much for your sweet comment!
Hi Christie!
I came here from a link up and I have to admit, I didn’t know painting upholstery was even a thing- I feel so enlightened. We bought a house from the 60’s that came full of all of its 60’s chic possessions….I could save so many things with this tip! If you’re interested, Id love for you to share a post over at my Tuesday link up!
Xoxo K
http://peeledwellness.com
* most of our upholstered 60s disasters are burlap-y in texture…I wasn’t trying to contradict the message of your post- it was just the first I ever even heard of painting upholstery
Yes, I wish I had never heard of it either….LOL. Thanks so much for stopping by and checking it out. I’m headed over to visit you now! 🙂
Many years ago I painted the brocade fabric on an occasional chair. It turned out perfect and still looks great. I think your biggest problem is because you were painting velvet.
You could be right, Anne. I’m sure the texture of velvet makes it more difficult to paint; however, the tutorial I followed was specifically for painting velvet. I’m glad your project turned out great and I’m even happier that you still have it, after years of usage. That’s great! Thanks so much for sharing your positive experience with me!